Difference between revisions of "LargeScout CreepyForest (EU2012)"
Jump to navigation
Jump to search
(d) |
|||
| (11 intermediate revisions by 2 users not shown) | |||
| Line 1: | Line 1: | ||
| − | + | {{Map Data Box (EU2012) | |
| + | |missions=[[Landed UFO (EU2012)|Landed UFO]] | ||
| + | |length=88 tiles | ||
| + | |width=48 tiles | ||
| + | |area=4224 tiles | ||
| + | }} | ||
| − | + | '''Notes''' | |
| − | * | + | * 3 [[Skyranger (EU2012)|Skyranger]] Drop Zones (NE, N, NW) |
| + | * The map has three hills: the largest is South, where the UFO has landed; East, which are the highest ones; and West, more uneven and with a smaller north-south ditch close to the map edge. | ||
| + | * East and West are separated from South hill by a ditch, that runs across the entire [[Maps (EU2012)|map]] and it needs to be crossed to reach the UFO. There's also another ditch separating them that leads directly into the UFO's entrance. | ||
| + | '''Tactics''' | ||
| + | * Since the UFO has landed the [[Aliens (EU2012)|aliens]] will be able to deploy a large force of four packs plus the UFO bridge crew. The alien numbers and the geography can make a frontal assault on the [[UFOs (EU2012)|UFO]] very dangerous since they'll have the higher ground and the numbers to inflict casualties on the attackers. | ||
| + | * Secure one of the East/West hills and try to draw aliens to the ditches where they'll be at a disadvantage - the East side is higher while the West side has less cover due to the terrain. | ||
| + | * When assaulting the South hill concentrate your efforts along one axis and be prepared to retreat if there's too much opposition. Remember, if the aliens come after you then you'll have the higher ground instead of them. | ||
| + | <br clear="all"> | ||
| − | + | <gallery widths=200px heights=150px perrow=7> | |
| − | + | File:Large Scout Creepy Forest.png| ''Loading screen'' | |
| + | File:Large Scout Creepy Forest 3 (EU2012).png| ''Starting Locations'' | ||
| + | File:Large Scout Creepy Forest 1 (EU2012).png| ''NE View'' | ||
| + | File:Large Scout Creepy Forest 2 (EU2012).png| ''SW View'' | ||
| + | </gallery> | ||
| + | {{Template:Maps Navbar (EU2012)}} | ||
| + | {{EU2012 Style}} | ||
[[Category: Enemy Unknown (2012)]] | [[Category: Enemy Unknown (2012)]] | ||
[[Category: Maps (EU2012)]] | [[Category: Maps (EU2012)]] | ||
Latest revision as of 21:57, 12 October 2013
| Missions | Landed UFO |
| Length | 88 tiles |
| Width | 48 tiles |
| Area | 4224 tiles |
Notes
- 3 Skyranger Drop Zones (NE, N, NW)
- The map has three hills: the largest is South, where the UFO has landed; East, which are the highest ones; and West, more uneven and with a smaller north-south ditch close to the map edge.
- East and West are separated from South hill by a ditch, that runs across the entire map and it needs to be crossed to reach the UFO. There's also another ditch separating them that leads directly into the UFO's entrance.
Tactics
- Since the UFO has landed the aliens will be able to deploy a large force of four packs plus the UFO bridge crew. The alien numbers and the geography can make a frontal assault on the UFO very dangerous since they'll have the higher ground and the numbers to inflict casualties on the attackers.
- Secure one of the East/West hills and try to draw aliens to the ditches where they'll be at a disadvantage - the East side is higher while the West side has less cover due to the terrain.
- When assaulting the South hill concentrate your efforts along one axis and be prepared to retreat if there's too much opposition. Remember, if the aliens come after you then you'll have the higher ground instead of them.
Loading screen

Starting Locations

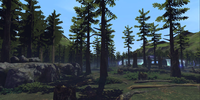
NE View

SW View

.png)
.png)
.png)