Missions (LWR)
In General
When a mission appears in the Mission Control room you have a certain amount of time to deploy to it before it disappears. Noting that you can only engage in one mission at a time and it takes time to travel to and from missions.
Any soldier lost will have a 10% chance to lose each piece of equipment (from 40% in LW 1.0).
Squad Sizes
Squad sizes in Long War Rebalance vary depending on the mission type. Unlike, LW 1.0, they can not be increased through Officer Training School upgrades.
| Mission Type | Squad Size |
|---|---|
| UFO Sites, DLC Missions, and Base Assaults | 8 |
| Abduction, Council, and Terror Missions | 6 |
| Covert Op Data Recovery Missions | 5 + 1 Covert Op |
| Covert Op Extractions | 3 + 1 Covert Op |
| Temple Assault | 8/9/10/11 (Impossible/Brutal/Classic/Easy) |
Rewards
All missions reward bounties for most aliens killed and usually some form of panic reduction for a successful mission. Most missions will have meld canisters that yield meld if collected. UFO Missions and Alien Base Assaults reward extra scavenged resources of alloy (based on the type of UFO) and elerium (based on recovered UFO Power Cylinders). Council missions will have set rewards that can include scientists, engineers, credits, panic reduction, and reward soldiers.
Any abduction, terror, or council mission that is completed in under 10 turns has a chance (10% per turn under 10) to have the council offer a 100-200 credit bonus (double on council missions).
All of these rewards will increase in value by 5% per month of the campaign and are modified based on the campaign length.
Abductions
Reward for Succeeding: credits/scientists/engineers/soldiers (see below), -2 panic in country, and -2 panic in continent (modified by Campaign Length)
Penalty for Failure: +4 alien research, +8 country panic, and +2 continent panic (modified by current country panic) (modified by Campaign Length)
Expiration Time: 12 hours
Alien Abductions are generated by an Abductor and are an Alien Mission that occurs a few times a month (depending on Campaign Length) but decreases in frequency by 5% (multiplicatively) each month that passes.
Each time the aliens successfully land an abductor on an abduction mission XCOM will be notified, regardless of where in the world they land. The aliens will attempt 2 sets of 2 abductions spaced a day apart (upped to 2 sets of 3 abductions at 6 months in). XCOM will only be able to respond to 1 of the abductions as the others will expire after one is attempted, so a commander must choose wisely.
The maps for each abduction will be chosen randomly, but smaller maps will be filtered out of more dense abductions.
The density of the abduction can be Light(0) -> Moderate(1) -> Heavy(2) -> Swarming(3).
The number of aliens at the abduction site depends on the density of the abduction and other factors:
| Condition | Number of Aliens |
|---|---|
| Light | 6-7 |
| Moderate | 8-10 |
| Heavy | 11-13 |
| Swarming | 14-16 |
| Alien Resources exceeds (50|80)% | +1 | +2 |
Abductions usually have 2 pods, but high Incursion Strength can lead to a 3rd pod (though the number of aliens will not change).
Under the alien activity display (see image on right) it will list the density of the abduction, the current level of the aliens, as well as give 1 or 2 + signs. One + sign means that there is either increased aliens due to alien resources being high, increased alien leader levels due to alien aggression being high, or increased aliens due to Incursion Strength being high. Two + signs means two of the previous items, three means all three.
An abduction which is not stopped by XCOM causes panic in the target country and continent, and provides the aliens with additional research. The panic increase is higher if the abduction was conducted in a country with less panic.
| Panic in Abduction Country | Country/Continent Panic Amount |
|---|---|
| 0-20 | +16 / +4 |
| 21-40 | +12 / +3 |
| 41-100 | +8 / +2 |
| Campaign Length | x2 / x1 / x0.5 / x0.25 |
Note that the country panic will increase by the amount of the country panic and continent panic combined as the country is always in the continent
All abduction maps that don't have 3 meld will receive additional meld up to a possible 3 canisters if finished in quickly. The result is that on average, all maps have a similar meld yield.
Rewards
Completing an abduction mission has a chance to grant a reward of credits, scientists, engineers, or a soldier, each with the following amounts:
| Reward | Amount |
|---|---|
| Credits | (80 + Rand(40)) * Abduction Density (0.6/1.0/1.6/2.4) Final Result increased by 10% per month |
| Scientists | Light or Denser: 1 plus a 20% chance for +1 Moderate or Denser: a 30% chance for another +1 Heavy or Denser: +1 and a 40% chance for another +1 Swarming: +2 and a 50% chance for another +1 Final Result increased by 10% per month Minimum of 1 |
| Engineers | Light or Denser: 1 plus a 20% chance for +1 Moderate or Denser: a 30% chance for another +1 Heavy or Denser: +1 and a 40% chance for another +1 Swarming: +2 and a 50% chance for another +1 Final Result increased by 10% per month Minimum of 1 |
| Soldier | Soldier Rank = Month/3 + Rand[2 * Abduction Density (1/2/3/4)] Clamped between 0 and the lower of the # of months that have passed or your highest ranked soldier (0-7), and then set to at least 1 (Specialist) |
Note that all rewards (or chances for rewards) are modified by campaign lengths except soldier rewards (accommodates for more soldiers lost on longer campaigns)
Terror Sites
Reward for Succeeding: 10 credits per civilian saved (modified by Campaign Length) (+5% per month), reduced country and continent panic (possibly increased panic if not enough civilians saved) (modified by Campaign Length)
Penalty for Failure: Loss of Country
Expiration Time: 8 hours
During Terror Missions you are required to eliminate all hostiles and save as many of the 18 civilians that you can. Aliens, who are active, but can see no XCOM soldiers, will target civilians. As well, each inactivated pod will have a chance to kill multiple civilians every turn that passes. This means that XCOM should try to engage all pods quickly and stay within sight of active aliens as much as possible if they want to minimize casualties. This can lead to some unwinnable situations though, so the balance between being aggressive and saving civilians vs being cautious and saving XCOM will likely vary mission to mission.
Terror missions will automatically generate 30 panic in the target country, and 8 panic across the same continent. However, each civilian saved will decrease the panic generated by the mission by 2 in the target country and 0.6 across the continent. Additionally, each civilian saved in a country that has NOT left the Council of Nations will award 40 credits. Both the panic alterations and bonus credits are modified by campaign length (2.0/1.0/0.5/0.25). The credit reward increases by 10% each month.
A Terror Site which is not stopped by XCOM causes the target country to immediately leave the Council of Nations and generates 20 continental panic (modified by Campaign Length).
Terror Sites are generated by a UFO, so you can prevent a terror mission by shooting down the incoming UFO before it can create the terror site.
The number of Terror Site missions decrease in frequency by 5% (multiplicatively) each month that passes.
All pods on terror missions will have a guaranteed leader and the leader levels are increased by 1 during terror missions.
Aliens at Terror Sites:
| Condition | Number of Aliens |
|---|---|
| Base Amount | 2 Chryssalid pods + 50% chance of 1 Zombie pod |
| Extra Aliens | +5 |
| Alien Resources exceeds (50|80)% | +1 | +2 |
UFO Sites
UFO sites are unique missions in that they will always have a command pod consisting of one or more outsiders and possibly one or more thinmen. These outsiders have the growth perk meaning waiting to engage them can result in them becoming very strong. As well, any activated outsiders will call all other enemies on the map to their location, making dealing with multiple pods quite common. The choice of whether to engage the outsiders early when they are weak or to clear out the rest of the map first is up to the commander.
After a UFO mission the player has the option to send additional salvage teams (at a cost). They will yield additional alloy and elerium with a random cost proportional to the size of the resource haul.
Starting in August, UFO missions will have guaranteed enemies:
- Aug/Sept = Cyberdisc
- Oct/Nov = Mechtoid
- Dec/Jan = Sectoid Commander
- Feb/Mar = Ethereal
UFO Class
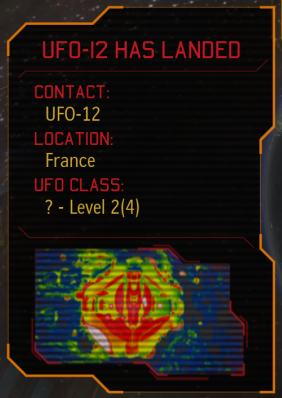
The UFO Class (see image on right) will list the type of UFO (unknown will show a ?), current level of the aliens, boosted level of the aliens, as well as give 1 or 2 + signs.
The boosted level of the aliens (number in brackets beside the current alien level) will only increase the attribute boosts from level upgrades that aliens receive. This means you will still fight the same enemies, but they may have increased attributes. The boosted level does not affect what types of enemies will be present or the leader levels (though a larger UFO class will lead to higher level aliens).
Leader levels of aliens on UFOs are independently increased based on UFO class as described here: Leader Levels.
One + sign means that there is either increased aliens due to incursion strength being high or increased alien leader levels due to alien aggression being high. Two + signs means both.
UFO Crash Site
Reward for Succeeding: UFO equipment and resources (with damage), -2 panic in country
Penalty for Failure: 4 panic in country
Expiration Time: 36 hours
When a UFO is shot down and not destroyed, a UFO Crash Site mission becomes available. Completion of a UFO Crash Site mission rewards the player with the possibility of recovering valuable components from the UFO; however, a crashed UFO may have some of it's precious artifacts destroyed or damaged.
Enemies on crashed UFOs will sometimes receive a wound. The amount of aliens wounded on a crash is random, with 50% of units rolling to be wounded from 25-75% of their HP.
UFO Landing Site
Reward for Succeeding: UFO equipment and resources (pristine), -2 panic in country
Penalty for Failure: 4 panic in country, UFO mission completion
Expiration Time: 16 hours
Some UFO missions will involve a landing. Whether or not this will be the case can often be determined by looking at the UFO's altitude (NOE altitude often means it will land). If you allow the UFO to land it will either generate a terror mission, an abduction, or simply a landing site. It may actually be in your interests to let NOE-flying UFOs land, as (a) it will save your interceptor craft some damage, and (b) it will net you a lot more salvage, including intact flight computers and power sources. On the other hand, it may be on a bombing mission. Successfully assaulting a landed UFO will also stop the alien mission from being completed.
The command pod may not be on the bridge. This is so you won't know exactly where this pod is, and thus won't be able to prepare a blitzkrieg to take it out.
Landed UFOs are both more difficult and more rewarding than crashed UFOs. This is because there are no enemies killed or wounded and none of the alien artifacts on the UFO will start damaged. Undamaged UFO power source cylinders are one of the best sources of elerium.
Council Missions
Council missions have also been modified, mostly to the tune of larger numbers of enemies, both seeded and airdropped. Airdrop spawns may be random, and include enemies other than Thin Men.
Council missions will occur every 15-30 days (modified by campaign length).
Drop-in aliens will increase based on difficulty and for each month that has passed.
Site Recon
Condition for Succeeding: Trigger the air strike and reach the EVAC zone
Reward for Succeeding: Variable, bonus +200 mission xp for each surviving unit
Penalty for Failure: +15 country panic, +5 continent panic (modified by campaign length)
Expiration Time: 2 hours
The Chryssalid Hive is not exclusively populated by Shark-lids and free-roaming Chryssalids anymore. You may find other aliens have been invited to the party too. Keep an eye on your ammo and move your troops carefully. Unlike vanilla, think twice before skipping this mission lest you be punished for your negligence.
Note that you cannot recover any corpses from the mission.
Target Extraction
Condition for Succeeding: VIP reaches the EVAC zone
Reward for Succeeding: Variable, Van Doorn, Friendly, Watson, Green
Penalty for Failure: +15 country panic, +5 continent panic (modified by campaign length)
Expiration Time: 2 hours
Rescuing Peter Van Doorn will now add him to your roster. Just remember that it's not fair if he has all the fun.
Target Escort
Condition for Succeeding: VIP reaches the EVAC zone
Reward for Succeeding: Scientists, Engineers, Credits, possibly Carlock, possibly reduced panic
Penalty for Failure: +15 country panic, +5 continent panic (modified by campaign length)
Expiration Time: 2 hours
Escort Dr. Marazuki, Sgt. Carlock or Mr. Thorne to the Skyranger, while killing all hostiles.
Asset Recovery
Condition for Succeeding: Kill all aliens
Reward for Succeeding: Scientists, Engineers, Significant Credits, Cache of Alloys or Elerium
Penalty for Failure: +15 country panic, +5 continent panic (modified by campaign length)
Expiration Time: 2 hours
Eliminate all hostiles and secure the asset.
Bomb Disposal
Condition for Succeeding: Defuse the bomb
Reward for Succeeding: Scientists, Engineers, Significant Credits, -20 country panic
Penalty for Failure: +15 country panic, +5 continent panic (modified by campaign length)
Expiration Time: 2 hours
With the help of power nodes to gain time (+2 turns per power node), find the Bomb and deactivate it.
DLC Missions
The DLC missions include the Slingshot and Progeny missions. Each DLC consists of a set of 3 missions which require success on each previous mission in order for the next to spawn.
The date for the DLC missions to occur in LWR is somewhat randomized and not predictable.
Slingshot

|
Friends in Low Places | Shaojie Zhang, a Triad operative from China, has decided to defect to XCOM and is requesting pickup. He brings with him a mysterious briefcase containing alien technology.
Zhang must be escorted to the extraction zone through a graveyard. Completing this mission sees Zhang join XCOM. The opposition consists mostly of Thin Men, but may also contain Sectoids, Chryssalids, and Seekers. Condition for Succeeding: Zhang reaches the EVAC zone |
|---|---|---|

|
Confounding Light | The equipment provided by Zhang proves to be navigational aids for an alien battleship approaching China. XCOM must plant these beacons on a train to send it off-course.
This mission plays similar to a bomb disposal, in that your units must "activate" transponders on the train before finally heading to the engine cabin and having it leave the station. There is a time limit of 10 turns (which is not extended as you proceed). Opposition can vary, but mostly consists of Thin Men and Mutons. Note that with all transponders activated, reaching the engine cabin controls on the train immediately ends the mission. Condition for Succeeding: A soldier reaches the engine cabin controls with all transponders activated |
|
Gangplank | The alien battleship has been brought low, and XCOM plans to capture the whole thing from the air. Your squad must move through the ship, disabling its engines to bring it to the ground with minimal damage. This can either be done in a manner similar to bomb diffusing or via the use of explosives.
This mission rewards XCOM with a Fusion Core required for certain advanced technology. Opposition mostly consists of mostly Mutons, Cyberdiscs, and Thinmen, some of which will drop from behind XCOM as they progress through the ship. Condition for Succeeding: All aliens are eliminated |
Progeny
Exalt Missions
Exalt missions will be unique in that they will consist almost entirely of Exalt soldiers. These soldiers similar to XCOM in their strength and weaknesses. As well, these missions almost always require a Covert Operative to be deployed on site before the mission starts, and these Covert Operatives tend to be separated from the rest of the squad.
Covert Operatives are restricted to Scouts, Infantry, Medics, and Engineers and cannot command other units or be commanded themselves. Covert Operatives gain the perk Quick Draw.
After moving, if this unit still has AP remaining, the next non-movement idle-ending action costs 0 AP.
Exalt Covert Op Data Recovery
Condition for Succeeding: Transmitter is not destroyed and all Exalt are eliminated
Reward for Succeeding: 200 credits (halved if the encoder is lost), 40 meld (modified by campaign length)
Penalty for Failure: 4 country panic (modified by campaign length)
Expiration Time: 48 hours
These missions are similar to their vanilla equivalent. You field a squad of five and defend an encoder and transmitter. Exalt comm arrays are available for your covert operative to hack which will force all exalt on the map to reload before firing again. Reinforcements will continue throughout the mission so be prepared to fight from all flanks.
Due to the constant reinforcements and Exalt's desire to rush the encoder and transmitter, an ideal squad for this mission should involve units that can deal a lot of damage (especially to flanked units) and manage drop-in overwatch. This is because if you fail to deal enough damage, the reinforcements may quickly result in you facing insurmountable numbers of Exalt, forcing you to retreat or die.
The missions start with 2 medium-sized exalt pods. Reinforcements occur every 2 turns starting on the 3rd-4th turn and will occur 3 times. For the purpose of enemy spawns, this mission is considered roughly 1 AL behind the current value.
The Covert Operative is not required to survive for this mission to be a success.
Exalt Covert Op Extraction
Condition for Succeeding: Covert Op reaches the evac zone with 3 towers hacked and 2 data sources
Reward for Succeeding: 100 credits, 30 meld (modified by campaign length)
Penalty for Failure: 4 country panic (modified by campaign length)
Expiration Time: 48 hours
In this mission type you are limited to only 3 soldiers and your Covert Operative. As such, you want to avoid getting into a prolonged firefight with Exalt; get your operative to the relays, hack them, and get out ASAP.
You must acquire 2 sets of data from the relays, which will always requiring the hacking of 3 arrays (the 2nd array will always contain no data).
An ideal squad will involve damage-dealers that can quickly sweep the site of the initial enemies while also surviving the first 2-3 waves of drop-ins.
The missions start with a small number of Exalt. Approaching or activating relays has no effect on triggering reinforcements.
The first set of Exalt reinforcements now arrive on turn 5/6/7/8 (on impossible/brutal/classic/normal) and will reinforce again every 3 turns. Each time Exalt sends in reinforcements there will be an additional 2 units, meaning that they very quickly become unstoppable if you take too long.
Example on Impossible:
2 units on turn 5, 4 units on turn 8, 6 units on turn 11, 8 units on turn 14, and 10 units on turn 17
Reinforcements will stop completely if you make it to turn 24. Due to the sheer number of possible reinforcements, it is advised to NOT try to fight all of the reinforcements, but simply activate the relays and retreat.
Exalt Base Assault
Condition for Succeeding: All enemies eliminated
Reward for Succeeding: 1250 credits, Illuminator Gunsight, Cognitive Enchancer, Neuroregulator, 400 meld, -10 Worldwide Panic
Penalty for Failure: 4 country panic (modified by campaign length)
Expiration Time: Does not expire
The Exalt base is crawling with a small number of elite Exalt pods, each containing an Exalt General (or Exalt Commander Iago Van Doorn). There will also be a few high level alien leaders as well.
The Exalt base is in a large cubic map, in an office/residence atop a Skyscraper. You are dropped off near a helipad. Inside consists of a foyer, that splits to a library/sitting room and a sparse Situation Room (where Annette's photo is visible), and to a large sunken central room (with surrounding high hallways) with EXALT's own bootleg Hologlobe. There are paths that reach around on the outside of the building on the perimeter. The layout of the map is mostly symmetrical. The roof is accessible, and you may have some success firing down through the skylights for the elevated bonus, but the line of sight from the skylights to ground level is quite restrictive.
There are no airdropped Exalt squads.
Falsely accusing a country of harboring the Exalt base will cause a massive spike in panic as well as a significant gain in alien research, so it is unadvised to "guess" where the Exalt base is until you know for sure.
XCOM Defense Missions
Under certain situations, the aliens will launch attacks against XCOM.
XCOM Base Defense
Reward for Succeeding: None
Penalty for Failure: -500 credits, all alien captives released, 20% of scientists and engineers slaughtered
Expiration Time: Immediate
This mission is always called: Operation Ashes and Temples.
When the aliens have high resources AND high aggression they will come for your base. Your base is assaulted by a UFO - typically a NOE altitude Assault Carrier, but it may have backup from other craft - which you can see coming and can shoot down, but it's extremely difficult: when the UFO alert/interception prompt appears, it will say "Warning! Warning! UFO vectoring to XCOM HQ!" on the lesser notifications on the lower-left of the screen. Shooting down that UFO will prevent the assault.
Like vanilla, you will get the chance to select and equip a squad for this mission. You select and equip 8 soldiers, of which a random 5 will be selected at the start. Additional soldiers from this pool will arrive as reinforcements, one automatically and further soldiers can arrive to replace losses. You'll also get a complement of Blueshirts (new Rookie soldiers) that start with bonus stats and a death perk. The reinforcements you get do not vary with Blueshirt casualties, only XCOM casualties. Blueshirt soldier will never bleed out.
The aliens will drop in to the command center, followed by flyers in the back and drops in to the MEC bay and two waves in the forward access tunnels. Expect this mission to be difficult, though the forces deployed can vary wildly based on RNG. However, always look around and check for the falling dirt to see if any waves are about to drop in the MEC Bay, particularly the upper areas at all four corners.
Failing this mission does not mean the end of XCOM, however it is damaging. The aliens will ransack your base, killing engineers and scientists and destroying credits before regular military arrive and bail you out. This mission will only happen once during a campaign, can only occur after September, and will always occur in the first year.
If you succeed, any surviving Blueshirts will join your roster, retaining any XP they gained during the base defense.
XCOM Air Base Defense
Reward for Succeeding: None
Penalty for Failure: severe damage and/or destruction of multiple interceptors
Expiration Time: Immediate
In addition to assaulting your base, aliens can now go after your interceptor stations. These missions will only be launched after your air game becomes significantly strong (a Firestorm is built). It will generate similar to an abduction mission, with XCOM soldiers outfitting in the Skyranger as per usual. The map takes place in the previously multiplayer only Interceptor bay. This mission must be completed to avoid severe damage or destruction of your interceptors.
If the Hyperwave Relay is built, the mission notice on the approaching UFO will say "Retaliation". Be aware you will enter the area through one of the side tunnels in the center of the map, so odds are that there will be aliens in both wings, and can easily be flanked by a wandering pod due to this.
Unlike the XCOM Base Defense, the Air Base Defense mission will not only happen frequently (especially after the player has started fielding plasma weapons) but it is also MUCH easier than the standard Base Defense.
Storyline Missions
These missions are required to progress and pass the game. They are significantly easier than their counterparts in LW 1.0 in order to make them less of a roadblock. The exception is the Temple Ship Assault which is significantly harder than LW 1.0 and may be the most difficult mission of a campaign.
Alien Base Assault
Reward for Succeeding: 1 Hyperwave Beacon, -10 Alien Research, Alien Aggression to 100%, Incursion Strength to 130%, Recover Country at 55 Panic, -10 Continent Panic, 2 Fusion Cores, 4 Alien Surgeries, 15 Alien Stasis Tanks, 10 Alien Foods, 2 Alien Entertainments
Penalty for Failure: No specific penalty -- though you will lose the entire squad as you cannot retreat from this mission
Expiration Time: Does not expire
The 1st alien base is auto-generated when you lose a country in the first month. You need to develop a Skeleton Key, and then place a satellite over an alien occupied country to locate and assault the alien base. With that in mind, you may want to do your first Alien Base Assault as soon as possible, as to face weaker aliens. That way, even if you do lose more countries, but don't want to risk soldiers attacking another Base, at least you can still progress with the storyline. For the first alien base assault, the most difficult enemy to face will be 2 sectoid commanders in the final room (or if it's really late in the game ethereals).
Like with UFOs, the commander will not necessarily be in the last room with the Hyperwave Beacon.
All pods will contain a leader alien and certain alien types will have bonus leader levels. As well, each time you successfully raid an alien base the next alien base will be fortified with extra aliens.
| Previously Successful ABAs | Additional Aliens (Not Cumulative) |
Outsider Shards required for Skeleton Key |
|---|---|---|
| 0 (First Attempt) | None | 1 |
| 1 | Chryssalid pod + Sectoid Commander pod | 2 |
| 2 | Muton Elite pod + Heavy Floater pod | 3 |
| 3+ | Sectopod pod + Ethereal pod | 4+ |
| Alien Type | Extra Leader Levels |
|---|---|
| Chryssalids and Sectoid Commanders | +2 |
| Muton Elites and Heavy Floaters | +5 |
| Sectopods and Ethereals | +8 |
Overseer Crash Site
Reward for Succeeding: Ethereal Device, UFO equipment and resources
Penalty for Failure: None
Expiration Time: 36 hours
The Overseer contains a significant crew that, while hurt from the crash, will still pack quite a punch.
The enemies you fight will be:
1 Ethereal pod
1 Sectopod pod
1 Heavy Floater pod
1 Muton Elite pod
1 Outsider pod
1 Cyberdisc pod
1 Sectoid Commander pod
If you fail, more overseers will spawn allowing you to attempt one again, so do not feel bad about retreating if you get overwhelmed on a first attempt.
Temple Ship Assault
Reward for Succeeding: Win the game!
Penalty for Failure: Lose the game!
Expiration Time: ~2 hours
The volunteer on this mission will gain access to multiple psionic abilities, including Distortion, Insentient Crush, and Rift, making quite a formidable psionic soldier. Do note that Distortion will prevent them from healing but also upgrade their Psi Inspire.
As well, the remaining council countries will immediately repair all damaged and repairing equipment before the mission.
The Temple Ship will contain some of the strongest alien leaders in the game. On harder difficulties, champion aliens will be invulnerable for their first turn, so they can be difficult to ambush. Aliens on the Temple Ship will never be prepared, off-guard, or unprepared.
Go in heavy, hit hard, and let nothing stand in your way. This may be the most difficult mission in your campaign.
At the end of the road, in the Ethereal Cathedral awaits the Uber Ethereal, Lord of the Alien Collective. Rushing the Uber Ethereal is not advised, as he will be able to distortion damage shared up to a range of 30 tiles. However, don't be too slow as he'll begin using psychic storm from a distance.
Good luck, Commander.


