Difference between revisions of "Initial Deployment"
m (Fix typos and added some clarifications in parenthesis) |
|||
| Line 6: | Line 6: | ||
Rookies are often anxious to see (and take a shot at) aliens. This can result in them piling out of the Skyranger as soon as it touches down and charging right into an ambush. A more methodical exit from the Skyranger will maximize alien causalities while increasing the life expectancy of agents. | Rookies are often anxious to see (and take a shot at) aliens. This can result in them piling out of the Skyranger as soon as it touches down and charging right into an ambush. A more methodical exit from the Skyranger will maximize alien causalities while increasing the life expectancy of agents. | ||
| − | The general rule of safer deployment is to not move units out of the transport on the first turn, when enemies have full TU available for reaction shooting. It's | + | The general rule of safer deployment is to not move units out of the transport on the first turn, when enemies have full TU available for reaction shooting. It's safer to move out on the second turn after enemies have moved and spent some of their TUs. The first turn can be used to deploy a smoke screen outside (and inside) the transport, and surveying the landscape through the craft's portholes (craft's walls do not block terrain revealing). |
==Tankless deployment== | ==Tankless deployment== | ||
<gallery widths="300px" heights="188px"> | <gallery widths="300px" heights="188px"> | ||
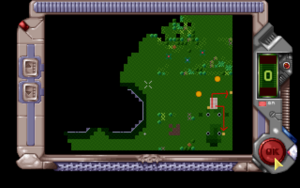
| − | Image:Darksun_geoscape_002.png|XCOM has shot down one of the first UFO's ( | + | Image:Darksun_geoscape_002.png|XCOM has shot down one of the first UFO's (CRASH-SITE-1 was in the ocean). Time to send a Skyranger full of rookies into action and see what these aliens are made of. |
Image:Darksun tactical 000.png|The soldier standing on the equipment pile tosses out a smoke grenade. End of turn 1. | Image:Darksun tactical 000.png|The soldier standing on the equipment pile tosses out a smoke grenade. End of turn 1. | ||
| − | Image:Darksun_tactical_001.png|The smoke grenade is right at the foot of the ramp to mask our troops deployment. Keep | + | Image:Darksun_tactical_001.png|The smoke grenade is right at the foot of the ramp to mask our troops' deployment. Keep an eye on the troops' stun damage (gray bar on top of the red health bar) or they might pass out from smoke inhalation.</gallery> |
| Line 20: | Line 20: | ||
Image:Darksun_tactical_002.png|The smoke grenade goes off. Agent one jumps off the ramp and hunkers down behind the landing gear. Agent two does the same in the other direction. Agent 3, knowing the coast is more or less clear sprints out to get a good firing position with her [[Auto-Cannon|AC]]-HE. | Image:Darksun_tactical_002.png|The smoke grenade goes off. Agent one jumps off the ramp and hunkers down behind the landing gear. Agent two does the same in the other direction. Agent 3, knowing the coast is more or less clear sprints out to get a good firing position with her [[Auto-Cannon|AC]]-HE. | ||
| − | Image:Darksun_tactical_004.png|Each turn the scout agents only advance a few wary steps. If they spot an alien someone else will shoot at it. If it doesn't die the scout will retreat. This pictures shows the | + | Image:Darksun_tactical_004.png|Each turn the scout agents only advance a few wary steps. If they spot an alien someone else will shoot at it. If it doesn't die the scout will retreat. This pictures shows the agent's entire move for this turn. |
| − | Image:Darksun_tactical_006.png|Three turns into the battlescape and only a few agents are outside the Skyranger. Half the deployed troops are taking cover behind the | + | Image:Darksun_tactical_006.png|Three turns into the battlescape and only a few agents are outside the Skyranger. Half the deployed troops are taking cover behind the skyranger's landing gear.</gallery> |
| − | Once they have spread out a bit, more agents will | + | Once they have spread out a bit, more agents will disembark. Staying spread out is vital. Alien grenades can be brutal without armor. |
Revision as of 12:32, 8 February 2019
A key part of the success or failure of any mission is the Initial Deployment phase, particularly due to X-COM pilots tendency to land right next to enemy UFOs. Rookie soldiers are probably happy to have such a short walk, at least until they get shot in the head the first step they take down the exit ramp.
The deployment phase will significantly vary depending on your resources (equipment and soldier experience), the tactical situation (especially the terrain and the location of the craft in relation to the Battlescape edges), and the Transporter that you are using to get to the site of the engagement. The following examples should be read as training material rather than an absolute rules to follow in most cases.
Deploying from Transport
Rookies are often anxious to see (and take a shot at) aliens. This can result in them piling out of the Skyranger as soon as it touches down and charging right into an ambush. A more methodical exit from the Skyranger will maximize alien causalities while increasing the life expectancy of agents.
The general rule of safer deployment is to not move units out of the transport on the first turn, when enemies have full TU available for reaction shooting. It's safer to move out on the second turn after enemies have moved and spent some of their TUs. The first turn can be used to deploy a smoke screen outside (and inside) the transport, and surveying the landscape through the craft's portholes (craft's walls do not block terrain revealing).
Tankless deployment

XCOM has shot down one of the first UFO's (CRASH-SITE-1 was in the ocean). Time to send a Skyranger full of rookies into action and see what these aliens are made of.

The soldier standing on the equipment pile tosses out a smoke grenade. End of turn 1.

The smoke grenade is right at the foot of the ramp to mask our troops' deployment. Keep an eye on the troops' stun damage (gray bar on top of the red health bar) or they might pass out from smoke inhalation.


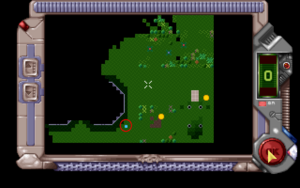
The smoke grenade goes off. Agent one jumps off the ramp and hunkers down behind the landing gear. Agent two does the same in the other direction. Agent 3, knowing the coast is more or less clear sprints out to get a good firing position with her AC-HE.
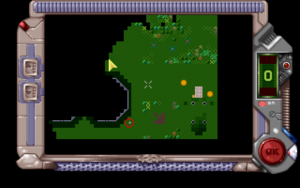
Each turn the scout agents only advance a few wary steps. If they spot an alien someone else will shoot at it. If it doesn't die the scout will retreat. This pictures shows the agent's entire move for this turn.

Three turns into the battlescape and only a few agents are outside the Skyranger. Half the deployed troops are taking cover behind the skyranger's landing gear.


Once they have spread out a bit, more agents will disembark. Staying spread out is vital. Alien grenades can be brutal without armor.

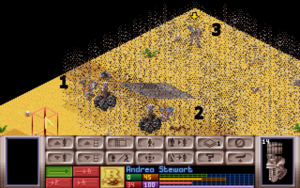
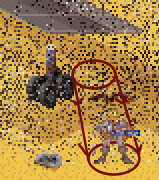
(This game is with some custom maps from XcomUtil. It adds pyramids to the desert to give the aliens some cover). About 5 turns into the battle and the first group of agents has spread out into the field. An alien has popped out of the door at (1). The scouts (2) are moving cautiously and are carrying fast weapons (Pistols in this case). Troopers with heavier weapons are backing up the scouts (3). Their possible lines of fire are marked with the colored lines.

When a scout makes contact with an enemy, the scout retreats out of the line of fire and the back line troopers with HE weapons take some shots. In this case there were two troopers with a line of fire on the alien and one of them killed it.
Once contact was made with the enemy the scouts all froze for a turn, kneeling. Sure enough the first Sectoid had a buddy who came out the door on the next turn. The scouts got it with reaction fire. This battle ended then since the other Sectoids didn't survive the crash.
Don't try to deploy all your agents! Leave some reserves on the transport. The diagram actually shows a pretty aggressive deployment. The number of agents deployed should be able to handle most situations. Only bring agents off the sky ranger as replacements or to fill in gaps if the deployed forces get stretched too thin.
Deploying with tanks

Deploying with tanks is fairly similar to deploying without them. You can often skip the smoke grenade. Since tanks can't advance in skills, they are cheap to replace in relative terms (especially non-hover tanks). Most aliens (save Mutons and Ethereals) will prefer to attack tanks over agents. So you can use them to draw fire away from agents. There are two goals when deploying tanks in the first turns. First, locate and prioritize targets close to the transport. Second, set up a screen around the transport exit to protect agents. In most cases you won't want to use the tank to attack enemies directly in order to allow agents a chance to advance. However, don't hesitate to kill aliens with the tank if there isn't a safe way to get an agent into position. Keep the tanks TU's in mind. It's best to keep about 50 in reserve to lessen enemy reaction fire. If the landing zone is very hot, withdraw the tank back to the transport and toss smokers. Note: Chryssalids seem loathe to walk up the ramp of the landing craft, so if one is visible from the back door, you can fire away at them with no retribution.

The first tanks comes just onto the ramp. Then it looks left and right before going on. This will show any aliens that are right around the transport door. It also conserves TU's to prevent as much reaction fire as possible. If your tanks get blasted before you can locate the aggressors, pop smoke and see the section on tankless deployments.

A Sectoid is spotted. The tank stops moving.

Tank number two exits the transport and checks the other direction to make sure no sneaky aliens are waiting to shoot agents in the back. It then moves out past the end of the ramp to screen agents should aliens come in range. Tank number one also withdraws out of range of the Sectoid it spotted.


The next turn tank number one re-aquires contact with the enemy. Since the alien can see any units disembarking from the Avenger and thus reaction fire on them, the movement of the HWP will make the alien spend its remaining TUs firing at him, preventing it from reacting to the agents.

Agents are deployed out of range of the spotted enemies if possible. In this case the HWP made the alien spend its remaining TUs so the agent will be safe from harm even though he debarked within sight of the alien. Tanks are better to lose than an experienced agent. Tank number one then clears the shooting lane.
The Sectoid is killed by the agent who just disembarked.


The area around the transport is secure. Two more agents sprint out of the transport and don't bother to save any TU's. They take cover behind the tanks and the craft landing gear. The rest of the deployment goes just like one without tanks. Use the tanks to scout and move one to three agents out of the transport a turn until you are ready to move out.
