Difference between revisions of "Large Scout"
m |
|||
| (34 intermediate revisions by 13 users not shown) | |||
| Line 1: | Line 1: | ||
==General Information== | ==General Information== | ||
The largest alien scout craft is a general purpose vessel that is used in all types of [[Alien Missions|alien mission]]. | The largest alien scout craft is a general purpose vessel that is used in all types of [[Alien Missions|alien mission]]. | ||
| + | |||
| + | This ship appears in ''[[X-COM|UFO: Enemy Unknown]]''. For the ''[[TFTD|Terror from the Deep]]'' equivalent, refer to the [[Cruiser]]. | ||
| + | |||
| + | ==Statistics== | ||
| + | <table {{StdCenterTable}}> | ||
| + | <tr {{StdDescTable_Heading}}><th align="left">Statistic</th> | ||
| + | <th>Value</th></tr> | ||
| + | <tr><td align="left">Size</td><td>Small</td></tr> | ||
| + | <tr><td align="left">Max Speed(km)</td><td>2,700</td></tr> | ||
| + | <tr><td align="left">Weapon Power</td><td>20</tr> | ||
| + | <tr><td align="left">Weapon Range(km)</td><td>34</td></tr> | ||
| + | <tr><td align="left">Weapon Range(range units)</td><td>272</td></tr> | ||
| + | <tr><td align="left">Damage Capacity</td><td>250</td></tr> | ||
| + | <tr><td align="left">UFO Downed points</td><td>125</td></tr> | ||
| + | <tr><td align="left">UFO Destroyed points</td><td>250</td></tr> | ||
| + | </table><br /> | ||
==Additional Information== | ==Additional Information== | ||
| + | |||
| + | Like the [[Medium Scout]], the Large Scout isn't that big a threat and a couple of [[Avalanche]] missiles are usually enough to down it. | ||
| + | |||
| + | The UFO contains two [[UFO Navigation]]s and one [[UFO Power Source]]. There are two things to watch out for: the alien soldier patrolling between the cockpit and the entrance chamber through the small, empty closet on the southern side and the Engineer in the reactor room (provided the UFO is intact, otherwise he may not even have left a corpse). The Navigators usually patrol back and forth between the cockpit and the reactor room but sometimes one comes out into the entrance chamber through the northern door. | ||
| + | |||
| + | There are two main routes one can take when inside. The northern door leads directly into the cockpit but is situated in a position where Navigators can see and reaction fire at soldiers while staying outside the soldier's field of view and therefore dodging the mutual surprise rule. The southern closet provides a safer way with a single chokepoint between the internal and external walls - standard movement-around-the-corner tactics apply here. Regardless which route one takes, the only remaining compartment before the UFO can be considered cleared is the reactor room in the center of the UFO. If you enter but see no one, it is possible that the Engineer is hiding behind the Power Source; shooting stun bombs at the opposite wall can quickly break the stalemate without risk of injury. | ||
| + | |||
| + | Like the Medium Scout, a shot down Large Scout's Power Source has a fair chance of leaving a large hole on the top of the UFO. One grenade of [[Grenade|either]] [[Alien Grenade|variant]] or a blaster bomb can significantly thin out the opposition before entering. On the other hand, a damaged Large Scout will invariably have its interior walls leveled to the point it's basically an empty shell with nothing to take cover behind as you enter - the Medium Scout's entry strategies can also be applied here. | ||
| + | |||
| + | == Recoverable Components == | ||
| + | <table {{StdCenterTable}}> | ||
| + | <tr {{StdDescTable_Heading}}><th align="left">Item</th> | ||
| + | <th>Sell Price</th> | ||
| + | <th>Quantity</th> | ||
| + | <th>Value</th></tr> | ||
| + | <tr><td align="left">UFO Power Source</td><td>$250,000</td><td>1</td><td>$250,000</td></tr> | ||
| + | <tr><td align="left">UFO Navigation</td><td>$80,000</td><td>2</td><td>$160,000</td></tr> | ||
| + | <tr><td align="left">Alien Food</td><td>$5,000</td><td>0</td><td>$0</td></tr> | ||
| + | <tr><td align="left">Alien Surgery</td><td>$38,000</td><td>0</td><td>$0</td></tr> | ||
| + | <tr><td align="left">Alien Entertainment</td><td>$20,000</td><td>0</td><td>$0</td></tr> | ||
| + | <tr><td align="left">Examination Room</td><td>$9,000</td><td>0</td><td>$0</td></tr> | ||
| + | <tr><td align="left">Alien Alloys</td><td>$6,500</td><td>35</td><td>$227,500</td></tr> | ||
| + | <tr><td align="left">Elerium-115</td><td>$5,000</td><td>50</td><td>$250,000</td></tr> | ||
| + | <tr><th colspan="3">Totals</th><td>$887,500</td></tr> | ||
| + | </table><br /> | ||
| + | Also see [[UFO Recovery Values#Large Scout|UFO Recovery Values]]. | ||
==Alien Deployment== | ==Alien Deployment== | ||
| − | + | <table width="100%" cellpadding="5"><tr> | |
| − | + | <td><table {{StdCenterTable}}> | |
| − | + | <caption><b>Sectoids/Floaters</b></caption> | |
| − | + | <tr {{StdDescTable_Heading}}><th align="left">Rank</th> | |
| − | + | <th>Beg./Exp.</th> | |
| + | <th>Vet./Gen.</th> | ||
| + | <th>Super.</th></tr> | ||
| + | <tr><td align="left">Soldiers</td><td>1-6</td><td>2-7</td><td>3-8</td></tr> | ||
| + | <tr><td align="left">Navigators</td><td>1-2</td><td>1-2</td><td>1-2</td></tr> | ||
| + | <tr><td align="left">Medics</td><td>0</td><td>0</td><td>0</td></tr> | ||
| + | <tr><td align="left">Engineers</td><td>1-2</td><td>1-2*</td><td>2-3</td></tr> | ||
| + | <tr><td align="left">Leaders</td><td>0</td><td>0</td><td>0</td></tr> | ||
| + | <tr><td align="left">Commanders</td><td>0</td><td>0</td><td>0</td></tr> | ||
| + | <tr><td align="left">Terrorists</td><td>0</td><td>0</td><td>0</td></tr> | ||
| + | <tr><th>Totals</th><td>3-10</td><td>4-11</td><td>6-13</td></tr> | ||
| + | </table></td> | ||
| + | <td><table {{StdCenterTable}}> | ||
| + | <caption><b>Snakemen</b></caption> | ||
| + | <tr {{StdDescTable_Heading}}><th align="left">Rank</th> | ||
| + | <th>Beg./Exp.</th> | ||
| + | <th>Vet./Gen.</th> | ||
| + | <th>Super.</th></tr> | ||
| + | <tr><td align="left">Soldiers</td><td>1-6</td><td>2-7</td><td>3-8</td></tr> | ||
| + | <tr><td align="left">Navigators</td><td>1-2</td><td>1-2</td><td>1-2</td></tr> | ||
| + | <tr><td align="left">Medics</td><td>-</td><td>-</td><td>-</td></tr> | ||
| + | <tr><td align="left">Engineers</td><td>1-2</td><td>1-2*</td><td>2-3</td></tr> | ||
| + | <tr><td align="left">Leaders</td><td>0</td><td>0</td><td>0</td></tr> | ||
| + | <tr><td align="left">Commanders</td><td>0</td><td>0</td><td>0</td></tr> | ||
| + | <tr><td align="left">Terrorists</td><td>0</td><td>0</td><td>0</td></tr> | ||
| + | <tr><th>Totals</th><td>3-10</td><td>4-11</td><td>6-13</td></tr> | ||
| + | </table></td> | ||
| + | <td><table {{StdCenterTable}}> | ||
| + | <caption><b>Mutons</b></caption> | ||
| + | <tr {{StdDescTable_Heading}}><th align="left">Rank</th> | ||
| + | <th>Beg./Exp.</th> | ||
| + | <th>Vet./Gen.</th> | ||
| + | <th>Super.</th></tr> | ||
| + | <tr><td align="left">Soldiers</td><td>1-6</td><td>2-7</td><td>3-8</td></tr> | ||
| + | <tr><td align="left">Navigators</td><td>1-2</td><td>1-2</td><td>1-2</td></tr> | ||
| + | <tr><td align="left">Medics</td><td>-</td><td>-</td><td>-</td></tr> | ||
| + | <tr><td align="left">Engineers</td><td>1-2</td><td>1-2*</td><td>2-3</td></tr> | ||
| + | <tr><td align="left">Leaders</td><td>-</td><td>-</td><td>-</td></tr> | ||
| + | <tr><td align="left">Commanders</td><td>-</td><td>-</td><td>-</td></tr> | ||
| + | <tr><td align="left">Terrorists</td><td>0</td><td>0</td><td>0</td></tr> | ||
| + | <tr><th>Totals</th><td>3-10</td><td>4-11</td><td>6-13</td></tr> | ||
| + | </table></td> | ||
| + | <td><table {{StdCenterTable}}> | ||
| + | <caption><b>Ethereals</b></caption> | ||
| + | <tr {{StdDescTable_Heading}}><th align="left">Rank</th> | ||
| + | <th>Beg./Exp.</th> | ||
| + | <th>Vet./Gen.</th> | ||
| + | <th>Super.</th></tr> | ||
| + | <tr><td align="left">Soldiers</td><td>1-6</td><td>2-7</td><td>3-8</td></tr> | ||
| + | <tr><td align="left">Navigators</td><td>-</td><td>-</td><td>-</td></tr> | ||
| + | <tr><td align="left">Medics</td><td>-</td><td>-</td><td>-</td></tr> | ||
| + | <tr><td align="left">Engineers</td><td>-</td><td>-</td><td>-</td></tr> | ||
| + | <tr><td align="left">Leaders</td><td>2-4</td><td>2-4*</td><td>3-5</td></tr> | ||
| + | <tr><td align="left">Commanders</td><td>0</td><td>0</td><td>0</td></tr> | ||
| + | <tr><td align="left">Terrorists</td><td>0</td><td>0</td><td>0</td></tr> | ||
| + | <tr><th>Totals</th><td>3-10</td><td>4-11</td><td>6-13</td></tr> | ||
| + | </table></td></tr></table> | ||
| + | <nowiki>*</nowiki> Needs testing to determine actual number. | ||
| + | |||
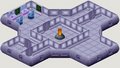
| + | ==Floor Plan== | ||
| + | [[Image:LargeScout.gif]] | ||
| + | |||
| + | ==Terrain Maps== | ||
| + | <gallery> | ||
| + | Image:UFO_120MAP-L1.JPG|Level 0 | ||
| + | Image:UFO_120MAP.JPG|Level 1 | ||
| + | </gallery> | ||
==See Also== | ==See Also== | ||
| + | {{UFO Navbar}} | ||
| + | |||
| + | [[Category: UFOs (EU)]][[Category: Research (EU)]] | ||
| + | [[Category:Enemy Unknown/UFO Defense]] | ||
Latest revision as of 04:11, 23 July 2013
General Information
The largest alien scout craft is a general purpose vessel that is used in all types of alien mission.
This ship appears in UFO: Enemy Unknown. For the Terror from the Deep equivalent, refer to the Cruiser.
Statistics
| Statistic | Value |
|---|---|
| Size | Small |
| Max Speed(km) | 2,700 |
| Weapon Power | 20 |
| Weapon Range(km) | 34 |
| Weapon Range(range units) | 272 |
| Damage Capacity | 250 |
| UFO Downed points | 125 |
| UFO Destroyed points | 250 |
Additional Information
Like the Medium Scout, the Large Scout isn't that big a threat and a couple of Avalanche missiles are usually enough to down it.
The UFO contains two UFO Navigations and one UFO Power Source. There are two things to watch out for: the alien soldier patrolling between the cockpit and the entrance chamber through the small, empty closet on the southern side and the Engineer in the reactor room (provided the UFO is intact, otherwise he may not even have left a corpse). The Navigators usually patrol back and forth between the cockpit and the reactor room but sometimes one comes out into the entrance chamber through the northern door.
There are two main routes one can take when inside. The northern door leads directly into the cockpit but is situated in a position where Navigators can see and reaction fire at soldiers while staying outside the soldier's field of view and therefore dodging the mutual surprise rule. The southern closet provides a safer way with a single chokepoint between the internal and external walls - standard movement-around-the-corner tactics apply here. Regardless which route one takes, the only remaining compartment before the UFO can be considered cleared is the reactor room in the center of the UFO. If you enter but see no one, it is possible that the Engineer is hiding behind the Power Source; shooting stun bombs at the opposite wall can quickly break the stalemate without risk of injury.
Like the Medium Scout, a shot down Large Scout's Power Source has a fair chance of leaving a large hole on the top of the UFO. One grenade of either variant or a blaster bomb can significantly thin out the opposition before entering. On the other hand, a damaged Large Scout will invariably have its interior walls leveled to the point it's basically an empty shell with nothing to take cover behind as you enter - the Medium Scout's entry strategies can also be applied here.
Recoverable Components
| Item | Sell Price | Quantity | Value |
|---|---|---|---|
| UFO Power Source | $250,000 | 1 | $250,000 |
| UFO Navigation | $80,000 | 2 | $160,000 |
| Alien Food | $5,000 | 0 | $0 |
| Alien Surgery | $38,000 | 0 | $0 |
| Alien Entertainment | $20,000 | 0 | $0 |
| Examination Room | $9,000 | 0 | $0 |
| Alien Alloys | $6,500 | 35 | $227,500 |
| Elerium-115 | $5,000 | 50 | $250,000 |
| Totals | $887,500 | ||
Also see UFO Recovery Values.
Alien Deployment
|
|
|
|
* Needs testing to determine actual number.
Floor Plan

Terrain Maps
Level 0

Level 1

